
The ICPC World Finals OS image ("WF OS") does not allow remote access by default (that is, by default the only way to "login" to a machine running the WF OS is directly from the machine's console).
However, it is sometimes useful for Contest Administrators/Staff to be able to use remote access, e.g. ssh, for contest setup, configuration, and testing. This article discusses several topics related to remote access to the WF OS, including enabling password-based remote ssh logins, enabling ssh keypair logins, and arranging support for GUI-based remote desktop operations.
By default, the ICPC WF image prohibits logging in remotely using ssh with user/password authentication. This is enforced using a custom sshd configuration file:
/etc/ssh/sshd_config.d/icpc.conf
The settings specified in this file override the defaults that are in /etc/ssh/sshd_config.
Specifically, /etc/ssh/sshd_config.d/icpc.conf contains the following line:
PasswordAuthentication no
This line prevents remote logins that attempt to use password authentication.
The easiest way to enable user/password logins is to edit that file and simply comment out this line by adding the comment character '#' at the start of the line, thus:
#PasswordAuthentication no
After editing and saving the file, simply restart the ssh daemon:
systemctl restart sshd
You should now be able to log into the installation account (or any other account which has been created on the WF OS machine) using ssh from a remote system, using the password for that account.
Note that both editing the /etc/ssh/sshd_config.d/icpc.conf file and executing the systemctl command
require "root" access, so these must be done while logged into the administrative account at the console
(see the separate instructions on Installing the WF OS), and the commands must be preceded with sudo.
A more secure (albeit more complicated) approach for allowing remote access to a WF OS machine is to provide support for ssh keys on the machine. This requires adding a public "ssh key" for each account to be enabled for such access. This is particularly useful (and more secure) in a contest environment where only system administrators should be allowed to log in remotely. This section describes various methods for generating such ssh keys, and explains how to install them into a WF OS system.
In order to use ssh key logins, you must first create an ssh key-pair. (The studious can check out this link for information on ssh key-pairs.)
There are three common use-cases for ssh keypairs:
By default, most Linux systems use the OpenSSH utilities such as ssh, sftp, scp, etc. These utilities are able to make use of ssh key-pairs generated by the ssh-keygen utility. The ssh-keygen utility will generate private and public key files (comprising the so-called ssh key-pair). The private key file must be kept private (it is essentially your login credentials, and anyone that has it can log into any system where the public key is installed). The public key can be installed on any system that supports the OpenSSH utilities. (Note that there is no private information in the public key file.)
To generate a key-pair on an OpenSSH system, enter a command similar to the following:
ssh-keygen -t ed25519 -f wfimg2023-ed25519 -C "My WF 2023 Key" -N ''
The -t option specifies the "signature" (basically, the encoding scheme) to be used for the generated keys.
The -f option allows you to choose the output file name(s); you can replace wfimg2023-ed25519 with any file name you want.
The -C option allows you to specify a comment that describes the key; this comment is visible in the public key file.
The -N option allows you to specify a "New passphrase"; the "empty string" (consecutive single-quotes) indicates that no passphrase is to be generated for the keypair.
After you execute the above command, two files will be created: the private key file: wfimg2023-ed25519
and the public key file: wfimg2023-ed25519.pub.
Keep the private key file secure!
You can move this file, along with the public key file, to your $HOME/.ssh folder, which is where most keys are stored.
Here is the contents of the wfimg2023-ed25519.pub file generated by the above command:
ssh-ed25519 AAAAC3NzaC1lZDI1NTE5AAAAIKdiBL6ACRF+xH9kBDwBOgfz9PK3w97QhWZwp3GNadHr My WF 2023 Key
Note the comment from the -C option at the end of the line.
To allow remote ssh access using your public key on a WF machine (or any OpenSSH machine),
append the public key file to the ~/.ssh/authorized_keys file in any user's account.
Once that line has been added to the authorized_keys file on a system, you can then use ssh to login to that user's account (without a password) by typing:
ssh -i ~/.ssh/wfimg2023-ed25519 user@remote.host
(The example above assumes you appended your public key to the end of ~user/.ssh/authorized_keys on host system remote.host.)
PuTTY (frequently just written "Putty") is a free, open-source SSH and Telnet client for Windows
(Putty can be downloaded here).
Putty supports the use of ssh keypairs, but since putty is not an OpenSSH utility,
if you generate a keypair on an OpenSSH system you must then convert the private key to a key that Putty can use.
There is a utility tool called puttygen which will do this. The puttygen utility is automatically included
when you download the complete Putty system, or it can be installed separately from the same download page.
Once you have installed puttygen, follow these steps to convert an OpenSSH private key to a Putty-compatible private key:
puttygen.exe utility.
wf2023.ppk.
puttygen.exe utility.
Once you have created the Putty-compatible private key, you must install it into Putty. To do this:
.ppk" file you created using puttygen.exe.
Note that the preceding presumes that you followed the earlier step of installing the OpenSSH public key in the authorized_keys file on the remote WF OS machine.
The preceding sections describe how to generate a public/private keypair on an OpenSSH system,
and then how to use puttygen to convert the resulting private key so that Putty (running on a remote Windows machine)
can use it to establish an ssh connection to a WF machine on which the corresponding OpenSSH public key has been installed.
An alternative is to use Putty to generate both the public and private keys, and then to transfer
the Putty-generated OpenSSH-compatible public key to the WF machine
(installing it in the appropriate authorized_keys file on that machine).
Generating a compatible public/private keypair is another function which can be done using the puttygen utility (see the previous section).
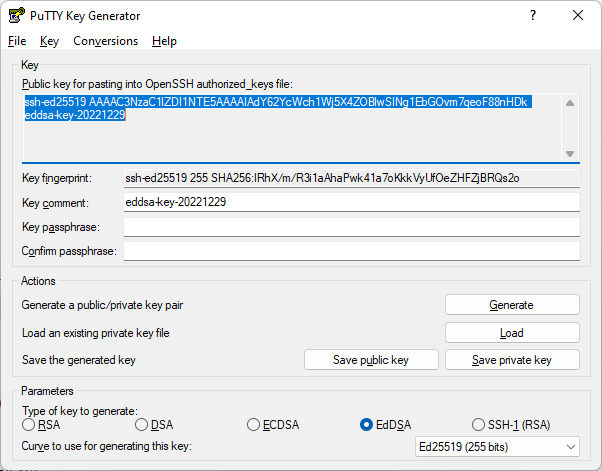
The steps for using puttygen to generate a public/private keypair are as follows.
puttygen.exe utility.
EdDSA.
puttygen will ask you to move the mouse around in the window to generate some randomness for the key generation.
The progress bar will advance indicating how much longer you have to move the mouse around.

wf2023.ppk.
puttygen.exe utility.
Once you have created the Putty public and private keys, there are two final steps:
~user/.ssh/authorized_keys file on the WF image system you want to login to
(or any Linux-type system for that matter).
If there is already text in that file, be sure to append the new public key to the end of the file.
You can put this public key on as many systems as you want to be able to login to.
.ppk" file you created using puttygen.exe.
A frequently useful thing to be able to do is to run GUI applications from your remote ssh session on your local desktop.
If your remote system is another Linux-based system, then you can simply start an ssh session using X tunneling into the ICPC WF system with the -X option of ssh:
ssh -X user@ip.address
where ip.address is the IP address (or hostname) of the system that is running the WF image.
If your remote system is a Windows-based system, you'll first have to install an X-server application on your Windows machine. One approach is to use Xming, a small-footprint Windows X-server application that is easy to set up and use and which allows you to run X-windows applications on your Windows desktop. (Any modern Windows-based X-server should work equally as well.)
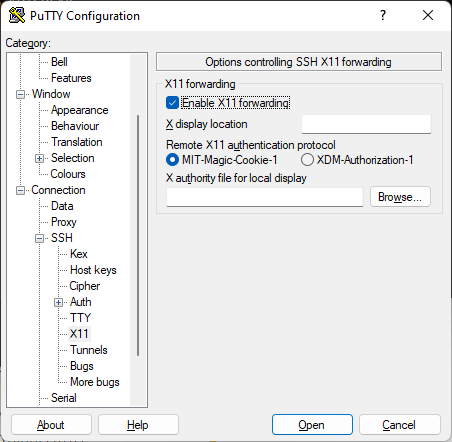
Once you have an X-server running on your Windows machine, you need to configure a GUI-based ssh terminal application such as Putty (see above) to communicate via X-Windows with the remote WF OS machine. To configure Putty for X-Windows, under the Connection->SSH->X11 settings select "Enable X11 forwarding" as shown below:

Be sure to go back to the "Session" settings and save the updated configuration if you want the configuration change to persist; then use the Open button to connect to the WF image system. This will open an X-windows terminal window on your machine. You can try it out by typing:
xeyes &
The X11 "eyes" application should pop up on your Windows desktop. You can run Eclipse by typing:
eclipse &
Note that some bigger applications such as Eclipse, CLion, Pycharm, etc. may take some time to load up remotely. Also, be sure to disable access control on Xming the first time you run it (there’s a check-box for doing that).
Revised: Sun Jan 1 02:19:46 UTC 2023